This post will cover the materials that I have gathered for the project to this point. The basics of what I am trying to achieve is a temperature controlled environment insulated from its surroundings to provide a stable temperature for an extended time. What is the first thing that you think of when you want to keep something for a long time at a stable temperature....why a fridge or a freezer of course. So that is item 1 on the list.
 Here are a couple of pictures of a second hand freezer that was 'free to this good home' as it were and would have otherwise found it's way to be scrap. It does\did actually work as a freezer still, however, it was surplus to the needs of its previous owner who was as grateful for its removal as I was for its acquisition.
Of course cooling reptile eggs is not what I am after, so here is where the fun begins. Bring on the heat!
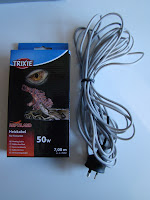
 This is a picture of the heat cord I bought today. What I plan to do is drill a hole through the fridge at a suitable location to run this cord through and then secure it to the inside of the freezer using these handy dandy cable clips I purchased today also.
The idea is to evenly distribute the heat cord throughout the freezer in an attempt to provide a well balanced heat source to keep the little bubbies warm in their eggs.
 The final item on the list is the means by which to regulate the temperature. It is an ATC-300 digital thermostat. It has a thermometer\ temperature probe that provides the input to regulate the power to the right hand plug on its power board based on the desired temperature. It also has a digital temperature display unit that houses the smarts for the thermostat. It provides in built alarm that sounds should the temperature fall a few degrees outside the desired range. The left hand plug has a timer function, as in on and off by a schedule that is also controlled by the main unit. I have no real use for the timer functionality as typically you would put a light on this in a reptile enclosure to simulate a day\night cycle. Obviously not required to incubate eggs.
The total cost of all this was around $120. Considering that a commercially bought incubator that would be lucky to have 10% of the capacity would be triple the price, we're off to a good start! If our Dragons do successfully consummate their relationship this season it is possible that we will see up to 5 clutches of eggs. last season, Lolly laid her first clutch and it was 25 eggs. This was a large number for a first clutch, but, it is not unheard of for close to 40 eggs to be produced in a single clutch. With that in mind, upon completion, this incubator should cater to what could be a large number of eggs (fingers crossed).
From here, the fun begins. I will post up my progress as it happens, so stay tuned!


No comments:
Post a Comment